Trueblue

Sunday, January 31, 2016

New house- The Little House that Could!

It's been awhile since we've posted anything, mainly because...we bought a new house!  About six months ago, we made a move from the east side of the state to the west side, and have been scrambling to find a home.  We knew we wanted a house that would let us test our DIY chops on a kitchen reno.  After many house tours, we settled on a cute 3 bedroom, 2 bath in the Fulton Heights neighborhood.  The house was previously a rental home, and it was rough!  The moldings were beat up, the floors were all scratched, and oooo-weee is the kitchen pretty.  But through all of the mess and clutter, the house had original hardwood floors, original moldings, and a lot of charm.

We decided that our first project to tackle would be the kitchen. Here is a little video of the before:

*for some reason this only plays in Internet Explorer.  

Similar to our last home, as soon as the ink dried on our mortgage papers, we headed over to the house for demo.  After an hour of intense work, here is what she looked like:

First, we had to take out each of the cabinets. Next, came the ridiculous faux brick paneling.  Behind the paneling was plaster and then a layer of lath that all had to come down.  We were ripping this kitchen down to the studs.  

We wanted to open up our kitchen, so we decided to knock down half of the wall that separates the dining room and kitchen.  This will now become a peninsula with our sink and dishwasher.  (Yes, we did have a contractor tell us if it was load-bearing or not.)
Once the walls and ceiling were demo'd, up came the floor.  I was crossing my fingers for some original hardwood- and I got it!  This is what was underneath 4 layers of linoleum:
We tried several methods of removing this glue/ paper combo, but the only thing that worked was super hot water and Murphy's Oil Soap.  

The glue became a really nasty sludge, which we had to shovel into the trash.  Here's what it looked like after three days of demo:
Already.so.much.better.


We haven't been able to make much progress since we've been waiting a lot on our electrician and drunk plumber.  Jeff was able to make a half wall to block off the former "nook" area, as well as drywall the left side wall, which doesn't have electrical. 


As I said before, we are doing a little rearranging of the layout with this kitchen.  The wall that used to separate the kitchen from the dining room has now become a peninsula, which will have a bar top built into it.  The water had to be moved from over by the window to our new sink area.  We also switched from an electric stove to a gas stove. We had a professional do that part for us so we don't blow up our new house.  The nook area will eventually have a door to the outside installed in it, so it will become a mudroom.  We bought our cabinets from Home Depot because they had the best deal and the style we wanted.  We decided that since we lost some of our cabinetry with removing part of the dining room wall, that we would order cabinets that go all the way to the ceiling.  Not only will our kitchen appear taller, but now we have more storage than before!  
Mock up of the kitchen from the peninsula corner. 

Mock up of the peninsula while standing at the window.  

We should have some more progress after this next week, so stay tuned.  Cabinets arrive next week! 

Kitchen to-do list:
  • Demo kitchen
  • Design kitchen
  • Run electrical
  • Buy light fixtures
  • Move water
  • Add gas line
  • Build half-wall separating mudroom
  • Buy appliances
  • Install drywall
  • Prime and paint walls
  • Sand and stain floors
  • Install cabinets
  • Install new appliances
  • Trim work 
  • Buy new door to bathroom
  • Buy and install new backsplash
  • Measure and install countertops


Saturday, August 1, 2015

DIY Ski Coat Rack

We've taken a bit of a break from any major renovations...because we sold our house!  We decided to take a leap of faith and move westward in the great state of Michigan to Grand Rapids.  We hope to find another "Mapleson Manor" to renovate.  In the meantime, we put together a cool tutorial on how to make a coat rack out of a ski.  This was a pretty easy project, and didn't take much time at all!

First, I found an awesome water ski at a local antique market for a bargain price.  Jeff loves water skiing, so I thought it would be a great piece for our house.  I also found some old coat hooks that would be great to use for the coat rack.

Next up, I wanted the hooks have a different patina, so out came the spray paint.  I used Rustoleum's Oil Rubbed Bronze.

Once I positioned the hooks where I needed them, I used a nail punch/ hole punch to add a pilot hole.  This made it easier to screw in the hooks.  

And this is the after photo: 


Sorry the photos are a little grainy. If anyone wants to upgrade my iPhone 4, please feel free!

Sunday, February 8, 2015

All I do is tile, tile, tile, no matter what

Seeing that it has been almost THREE months since we updated you on our *quick* bathroom renovation, we feel our loyal readers should probably be filled in on our progress.  Our bathroom renovation is complete (sort of) but there were so many things we learned along the way, we wanted to break this renovation into several posts.

When we last spoke, we had started demolition of the wall tile over Thanksgiving break.  Since we had the long weekend, we thought "Easy-peasy, demolition will be over by this weekend, backer board will be on the walls by Sunday and we can start tiling." WRONG. Do not for one minute think that the demo on those HGTV shows is realistic.  Demo SUCKS.  The hitting and destroying things part is really cool, but then the next day you have Stay-Puff marshmallow man hands and they will barely grasp a pencil.  On top of the pillow hands, the clean up part is the worst.  Every 5 minutes we had to stop to pick up chunks of tile/ concrete/ drywall and carry them down our carpeted stairs (guess how clean those are now) to the trash.  Demolition continued all week after work each night, and we even had to enlist some big guns (who wished to remain anonymous in the blogosphere) to help us finish before the plumber was to arrive the next weekend.


Underneath our floor.

The plan for the plumber was to move our shower head from the short wall to the left side of our bathroom, as well as move the toilet line from the left side of the bathroom to the right side.  This would free up space for our double vanity and better utilize our floorplan.  The plumber also put in the shower base for us, which made us do a little happy dance because it gave us a visual of what our shower would look like shortly.  Ha.

The next week was dedicated to putting up the Hardie Board.  This is essentially the water-proof cement board that would go under our shower tile. Jeff was in charge of research on how to cut and install the board.  We started by using a box cutter with a carbide blade to cut the stuff.  We followed this video https://www.youtube.com/watch?v=3ULbcdphAls to a T.  Here is the result:


Hulk Smash!

This happened multiple times and resulted in several trips to the hardware store. As you may have guessed, there was a lot of cursing this week, and in my delirium, I started singing the Barney theme song.  I changed the lyrics instead of saying "love," the lyrics were changed to "hate."  It looked something like this: Me- singing the modified Barney song to the Hardie board.  Jeff- rolling his eyes and hulk smashing more board.  Not my most creative moment, but it got my sentiment across.

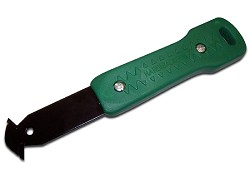
We decided to take a break and do a little more research.  We realized that yes, we had to use a carbide blade to cut the board, but it had to be some fancy tool that had a hook to it, which would assist with the cutting.
Once we had the appropriate tool, life was so much easier. We were able to get the rest of the board up and in place. 
Blurry picture of the window
The hangover bench. 


Once that was complete, we had to mud the joints in the shower so no water would seep in.  We allowed a day to dry and then it was time for the waterproofing.  All of our research revealed that using Red Guard in your shower would provide the best waterproof barrier.  This stuff goes on as a hot pink color and dries red (hence the name).  Once the first coat was dry, we had to put on the second and final coat.  

First coat of Red Guard


It was FINALLY time to tile!  In our design, we wanted our entire shower to be floor to ceiling white subway tile.  The shower space is about 8 x 3 x 8, so we needed multiple boxes of subway tile.  I am a bit of a perfectionist when it comes to symmetry and tiling, so the process was very laborious.  Jeff was on tile saw and mortar mixing duty, while I spaced out and mounted the tile.  This process took so long, we were still tiling as of Christmas weekend.  


Mid-tiling


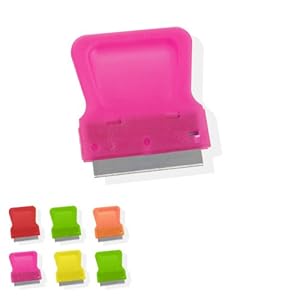
We decided that we wanted to have white subway tile and gray grout in our shower for a few reasons.  If we picked the wrong shade of white grout, it might look like we had super white tile and yellowing grout, and down the road it would show every unclean spot in the shower.  Jeff misread the directions on the grout and/or waited too long, and the grout would not come off with water and a sponge.  I was out of town, and told him to leave it for me to handle.  Unfortunately, we do not have a picture of the over-grouted walls.  I tackled the project with a scraper about this size:

With "Orange is the New Black" set on my iPad, and a whole pot of coffee brewed, I spent the entire day in the shower scraping off grout. And I still wasn't finished.  But I did have a small desire to nickname someone Crazy Eyes.  It took a few more days of scraping to finish the project.  Once the grout was complete, it was time to seal it.  We used a spray grout sealer that is just spray and wipe.  This was probably the easiest step of the whole process!  Jeff installed the shower head and handle, and we were now ready to use our shower!!

Here is a video of the finished product:


Stay tuned, we still have posts on drywall, beadboard, floor installation, and all of the finishing touches!  


Wednesday, November 26, 2014

It's hammer time!

After many months spent showering in our teeny tiny shower stall, we decided that it's finally time to demo the bathroom! The previous owners created a huge bathroom space, but for some reason only installed a small standup shower.  Not so fun when trying to shave your legs.

After much hemming and hawing, we decided to redo the entire bathroom ourselves, except for the plumbing.  Here's a short video showing the before of the bathroom.


After about 5 minutes of valiantly trying to remove tile from the wall, we had a foot-wide hole in the drywall.  After a quick Google search, the best solution for removing tile from drywall is to actually remove the drywall.  Just one more thing to add to our budget!

We decided the fastest path to taking down drywall and tile was to use a sledgehammer.  If you ever need to get out some pent-up aggression, demoing a wall is definitely for you!  After a few hours of breaking tile and drywall, here is what the bathroom looks like now:


Our to-do list for the week includes:
Take out the shower stall
Remove the sink and mirror
Remove the toilet
Finish removing all drywall (to be replaced with cement board)
Remove all floor tile and backer board
Eat lots of Thanksgiving food
Root for the Chicago Bears!

And all of this needs to be finished by Saturday.  A large task, but definitely achievable.  Stay tuned for the continuation of our remodel. Happy Thanksgiving everyone!

Sunday, August 17, 2014

Splish Splash, I was taking a bath- bathroom renovation v.1.0

If you've ever come over to our house, most likely you will need to use the bathroom at one point or another.  The main floor bathroom is incredibly tiny, so it's crazy to think that it's actually a four piece bathroom.  Let me introduce you to...Big Woody.  (insert dirty joke here.)
Who wouldn't want to sit on that lovely wooden throne, am I right? To the left of the doorway is a floor to ceiling cabinet, that we assume the previous owners installed.
(You can't get a very good picture of the cabinet, so I had to climb into the tub to get this shot.)  To the right of the doorway is the world's tiniest sink, which also appears to be built into the walls. 
And to top off all of Big Woody's decor, let's take a moment to appreciate the light pink tile with coordinating paint color:
Whoo! She is a beaut!  First things first (I'm the realest), we wanted to open up the space above the toilet and get rid of the clunky cabinet. A few jerks of the pry bar later...
So.Much.Better. We think we are going to put some open shelving above the toilet so we can still have some storage.  But, that's for another day.  Preferably when Jeff is home, and he can attend to the saw and I can keep all of my fingers intact.  

Our next item on the agenda was to tear down the other clunky cabinet to the left of the door.  Seriously, if you are over 125 pounds, don't bother using this bathroom, it is so narrow!  (Which may explain why I never used that bathroom.)  This cabinet looked to be a little more difficult to remove, so I focused on paint colors while Jeff figured out how to pull out the cabinet.  

Life got in the way for a few weeks, but the itch to start painting was getting to me. I so sweetly asked Jeff to remove the cabinet so I could paint. What we didn't know is this was going to extend our quick bathroom project into a week-long debacle.  It appears that the previous owners actually built the cabinet first before putting in the dry wall.  Once we removed the cabinet, we were left with large holes in the wall, the ceiling, and the floor.  Terrific. All I wanted to do was paint.  Now we have to make another trip to the hardware store.  
Behind the cabinet.
Our solution was instead of using drywall (drywall was too big of a challenge for us), we chose bead board instead.  We chose this because Jeff could just make one cut (**I mean, the hardware store could), shoot some nails into it, done!  That solved the problem with the wall, but we still had to figure out the ceiling.  Jeff bought a small drywall sheet and cut to fit, added some spacing around the ceiling joists and up it went to seal the giant hole where the cabinet was.


That still left us with the hole in the floor.  We had no extra tile lying around in the house, so we had to come up with Plan B.  Our initial thought was to try and find a tile similar at the store.  In a brief moment of brilliance, I noticed that our floor tile was also used as a border around the bottom of the bathroom wall. You can see it if you squint reallllly hard.
What if I just chiseled it off and reused those old tiles in the hole?  Even Jeff agreed with my idea (way to think on my feet!) and I chiseled away.
I may have left some holes in the drywall. Whoops.

I remembered from one of the many HGTV shows I've watched that you can take all of the gunk and glue off of tiles by heating them in a crockpot.  We decided to give it a go.  
Getting ready for their bath!
It totally worked!  I had to pick off some of the leftover goo, but they were still good to use!  Jeff got to work laying the tile, and we had almost enough to cover the whole area.  We had some extra subway tile lying around and we used those to make a makeshift border.  Not a perfect solution, but it doesn't bother us at all.  
 Let's do a little before and after to appreciate Big Woody's transformation:

Bye, bye Woody!

Corner cabinet before and after

We still have a few more updates we'd like to do to this bathroom (add corner shelves, wallpaper behind the toilet, shelves behind the toilet, new light above the vanity) but at least we can now walk into the bathroom. Feel free to come over and use our bathroom!

Monday, August 4, 2014

Why in the hell would you cover that up!?

*Bonus points if you caught the Nicole Curtis reference! This is part 2 of our "Drop it to the floor" hardwood floor renovation.  Now that all of the holes in the floor were patched, it was time to fill in the cracks. We used Elmer's Carpenter's Wood Filler to fill in the cracks.  To use, we just took a big blob of putty and smashed it into the crack.  Once it was filled, we smoothed it over with a putty knife.

We knew we needed a sander, but I wanted someone that would explain the process to me as if I was a 5 year old.  We chose a local equipment rental place, Button's Rent It, and they were wonderful.  On top of explaining everything to me in detail, they gave me a DVD that shows the process as well.  I didn't feel like a dumb girl trying to do a boy's job.  We had to rent a belt sander to sand the main part of the floors, and we also rented an orbital sander to sand the edges.  They tell you to wear earplugs while you sand, and I thought, "I worked alongside monster trucks and dirt bikes for 7 years, I don't need no stinkin' earplugs." Um, yes you do.  The sanders are SO LOUD!  

The Button man explained to me that there were three different grits that we should use on our floors.  The thickest one (that looked like a pebbled road!) would take off all of the varnish and stain from our floors.  Since we were charged per piece of sandpaper, he told us that we could probably go from the thickest grit paper to the finest grit of the papers to smooth out our floors.  His tips definitely worked AND saved us time and money.  We originally set out with Jeff using the belt sander, and I was using the orbital sander.  Ha! I turned on the damn thing and it nearly knocked me over!  Picture this, you have a 25 pound machine that you have to hold in both hands in a deep squat position.  Then, when you want to move to another section of floor, you have to smoothly carry this squirmy thing in a sumo-like squat.  Talk about a total body workout! Needless to say, I switched machines quite quickly.
It's a long way until we have naked floors!


Living Room done- Dining Room on deck.

After the floors were sanded, we wiped them down with a rag and mineral spirits.  This cleans up all of the extra dust before staining.
Naked Wood!  Do you notice our floor imperfection?

Staining was a debacle in itself. We have A LOT of wood in our house: around the doors, around every window, every entryway, etc.  The previous owners did a beautiful job, but the color is a sort of orange-y wood color.  Ick.
Orange-y wood. 

No way was I about to paint all of those molding white OR strip them all and stain them a darker color.  With that being said, we wanted dark floors, so we had to find a color that went with our orange wood moldings.  I took a piece of painted wood to my new besties at Sherwin-Williams and explained what we were trying to do.  They were super helpful and explained the different types of stains and which colors were in our wood family.  We ended up choosing Sherwin-Williams Wood Classics Oil Stain in Fruitwood.

After work, Jeff and I drove over to the house along with our delicious dinner of Taco Bell. (Yea, Supreme Tacos!)  We started off staining in the corners of the living room.  Be very careful on where you decide to start staining, otherwise you will be saying, "Nobody puts Baby in the corner" a la Dirty Dancing.

Nobody puts Patti in a corner!

We used lambswool pads to rub in the stain, then waited the allotted time on the can before wiping off the stain with a rag. We wanted to make sure that the new wood didn't come out a different color than the older wood, so we left the stain on the new wood just a few minutes longer.  This was by far the easiest step of the whole refinishing process.  I think we were done with both rooms in less than 2 hours.  Woo hoo- an early night!

Finally, we were to the polyurethane step! We stepped into our house the next evening (with TB again!) and got to work.  To put the poly on the floor, we used a paint roller with a long bar attachment and just rolled it on.  This is a very stinky step in the process, so make sure to have your room well-ventilated.

Mid-poly

Once the whole floor was rolled, we called it a day.  The floor needs two coats of poly, which required us to return the next day.  When polyurethane dries it leaves behind tiny bubbles on the surface.  To remedy this, we had to go over the surface of the floor with a light sanding by hand, then a wipe down with tack cloth to make sure there wasn't any dust left behind.  We rolled out another coat of poly, while singing "Roll Out" by Ludacris.  Now all we had to do was wait for it to dry!  What do you think?

Let's just take a trip down memory lane and recall what it used to look like in this room: 
Our carpet oasis.
Our new dance floor!

Thursday, July 31, 2014

Drop it to the floor!

The snowy, freezing day in January Jeff and I signed our mortgage papers and got the keys to our first home together, he looked at me and said, "What do you want to do now?"  I looked at him with a grin and remarked, "Tear up some carpet."  


As you can see in the grainy photo above, our living room and dining room were covered in beige Grandma-esque carpeting.  After a little peeking under the rug inside the closet, we realized that both rooms hid some beautiful hardwood- HGTV here we come!


We set out for our new home ready to tear some sh!t up.  Armed with a pair of hand-held razor blades, we started tearing the 80's out of our home...and discovered a problem.  The floors were not hardwood throughout. The previous owners had converted the sun room to increase the square footage in the living room.  The entire floor of the addition was covered in plywood instead of hardwood (Where Jeff is standing).  Also, in the living room, a wall had been moved, and a 2x4 was inserted instead of new hardwood.  


Luckily, the internet makes all renovation problems seem fixable.  Jeff researched a few ways to fix our patches, and we realized we'd have to make a trek out to the lumber store to buy hardwood.  This was NOT going to be an easy sand, stain, poly floor renovation.  But, I digress. 

 Once the carpet was rolled up, we were left with about a million staples to remove, along with the tack strips around the perimeter.  Jeff tackled the strips, while I tackled the staples.  I used pliers to pull them out.  Mental note- USE GLOVES!  I had so many blisters on my hands by the end of the night, I was rendered almost useless.  After Shop-Vacing a crazy amount of metal bits, carpet, and wood splinters, we dragged ourselves back home for a few hours of sleep.  

The next day we went to buy the wood.  Of course, there was a snowstorm and the lumber yard was about 20 miles away.  We came armed with a chunk of our floor to have the sales guy identify which type of hardwood we had.  After avoiding a few vehicles that were swerving on the snowy highway, we unloaded all of our wood.  Did you know that wood bundles come in pre-cut pieces?  (Well Jeff did, I didn't.  Shocking.)  It seemed like it would be a pretty easy feat- just find the right size pieces and fill in the gaps, right?  In reality, installing the floor was like a very complicated jigsaw puzzle.  We didn't want there to be an obvious break between the new wood and old wood, so we had to feather pieces of the new wood into the old flooring.  Once we got the hang of it, the floor seemed to go down pretty smoothly.  
Don't you love our window treatments? Blech!

While Jeff was working on the addition, I was trying to figure out how to get the 2x4 from the old wall out of the floor.  I was armed with a chisel and a hammer to try and chisel out the cement they used to secure the board in place. Even after all of the cement was gone, it wouldn't budge. Luckily, Jeff is much handier than I and realized the board was nailed down and had to trek down to the basement to hit the nails out from underneath.  Mission accomplished! 

The problem with this section of flooring is the large hole runs perpendicular to the rest of the floor.


 We had to decide if we were going to feather in tiny chunks of hardwood to make it look like there wasn't a hole there or run our hardwood perpendicular and just consider it a "flaw" in our floors. Would you rather make a bunch of little wood cuts or lay down three pieces of hardwood and be done with it?  Guess which way we chose? The flaw in our floor is actually one of our favorite parts of the house- it gives us a daily reminder of our problem solving skills! Our next post will follow us through the process of sanding and staining our floors. In the meantime, we will be tap dancing on our brand new/old floors!