Trueblue

Tuesday, August 2, 2016

An ugly duckling bathroom renovation reveal!

There has been much progress at Mapleson Manor the past few months!  Although we LOVE starting a project, unfortunately, Jeff and I are not so motivated to finish what we started.  I call it project ADD. Since we haven't updated our readers in awhile, we thought we'd reveal our half-bathroom renovation...even though it is not complete.

Just like our last house, we have a half-bathroom in our kitchen.  It's a little weird, because, well...cooking...next to a bathroom.  Kinda gross.  Luckily, we don't mind at all! So, here is the ugly duckling when we first took a look at her:


I don't know where to start.  The lovely hunter green moldings?  The striped wallpaper? Or the wooden toilet seat?  It all had to go.  Immediately. 

Jeff took out the sink, toilet, and the floor. Which left us with this:

There was no way we were keeping that wallpaper, so I researched a bunch of different ways to remove wallpaper.  We ended up buying a scoring tool that makes small cuts into the wallpaper, and the wallpaper remover gel that helps release the glue. 

The spray worked well, but we ran out.  We ended up just filling up the bottle with hot water and spraying that on the walls, which also worked.  

Our next step was to fix up the floor.  I originally wanted to keep the original hardwoods that were underneath the tile, but they were so warped, and it was so tricky to get the floor sander in that tiny space, that we decided to go with a vinyl tile instead.  
Since the floor was so misshapen, we put down a plywood under-layment to make the floor smooth and ready for tiling.  

We chose a great neutral gray vinyl tile by Stainmaster- and it's groutable.  This was key, because we wanted the tiles to look like real ceramic tile.  The tiles are self-adhesive, so all we had to do was peel and stick.  The backing on the tiles has arrows, so you know how to line up the tile. We used spacers to set the tiles, but since the tiles are glued, we just used them to set the tile in the right spot.  

Side note, there was some painting done before we laid down the tile.  The bead board received a few coats of Pure White by Sherwin-Williams and the walls were painted Dutch Licorice by Valspar.

Now, the directions said that we were supposed to use a heavy weighted roller of over 100 pounds to roll and smooth the tiles so they stick correctly.  I am no expert, but Jeff and I just walked all over the tiles after they were set since we weigh over 100 pounds.  Saved us a few dollars, and 5 months later, the tiles still haven't moved.  

We then grouted the tile with some pre-mixed vinyl tile grout by Blue Hawk in Saddle Gray, and capped it off with some white shoe moldings.  

Jeff installed the toilet (with a new seat!) and a new sink from IKEA, and the bathroom was almost complete!  


After a few trips to Hobby Lobby for a mirror, anchor, and hooks, our bathroom is complete!


We still have a few shoe moldings to finish up, as well as buying and installing a bigger floor transition, but overall, the ugly ducking bathroom has become a swan!  This bathroom was actually pretty inexpensive to renovate.  The priciest thing was the IKEA sink, which was less than $200.  The vinyl tile were affordable at $1.28 per tile.  The most time consuming part of the whole makeover was removing the wallpaper, something I hope to never have to do again.

Let's see the before and after to truly appreciate the transformation:
So...what do you think?

Saturday, April 9, 2016

This is the project that never ends...yes it goes on and on my friend.

As we continue our never-ending project of renovating the kitchen, we have some progress to show!  The last time we checked in, we didn't even have drywall up, so this will look pretty impressive. Please shower us with compliments.

It was now time for us to install our drywall.  We had installed drywall once before in our bathroom project, so we had some experience on what we needed to do.  Little tip: pay the extra money to have the hardware store deliver your drywall if you don't have a truck.  It was such a time-saver to have all of the drywall brought to us, instead of shoving it into a too small Jeep while it snowed.

Jeff insulated the exterior wall.  This was a surprisingly easy step.  You just staple the insulation to the top of the studs, roll it down, and cut it.  The entire process took about an hour.


Once that was done, it was time to put the drywall on the ceiling.  (I helped out tremendously by repeatedly singing, "we got drywall on the ceiling" to the tune of "Dancing on the Ceiling" by Lionel Richie.)  We hooked the drywall up to this fancy drywall contraption lift and rolled it on up to the ceiling.

This proved to be a pain in the neck because we have recessed lights in the ceiling- which you need to cut a hole for.  But, if you don't measure and cut a hole before, then how do you know where the light is?  This conundrum stumped us for awhile, and we decided to just try measuring from the edges of the wall to the center of the light and cut a circle.  We used a drywall circle cutter to cut the hole. Wellllll, we didn't measure exactly right, so Jeff had to hack away at the drywall to get the exact circle we needed.  Thankfully, the recessed light covers shield the mistakes!  After the first piece was installed, we moved onto the remainder of the ceiling with minimal problems. (except the time Jeff accidentally left his tools on top of the drywall in the ceiling and almost forgot them up there)  After the stress of installing the ceiling, the walls were a piece of cake.  While Jeff installed, I followed behind him taping and mudding the seams of the walls.


At this point, we had to pause on walls until our electric was all finished. Since we were down a day while our electrician worked, we decided to sand and stain our floors.  Why not? We've done it before, so it should be easier this time. We rented two sanders, an orbital and a drum sander.  I personally like the drum sander better, I think it does a faster job than the orbital, but the orbital is cool because you can sand just like a regular palm sander.  Look at the beautiful pine floors we found under the linoleum!


Here are the floors after a coat of stain:

Once the floors and electric were finished, we tackled installing the cabinets.  This was not as easy as I thought it would be, because I had to be the brace to hold up the upper cabinets.  In a professional world, you would install a brace to make sure the cabinets are level, which also provides a resting area for the cabinets while you screw them into the stud.  Well, we were much smarter than that. I channeled my inner hulk while I silently yelled curse words and held the cabinet up from beneath.  We installed the corner uppers and then moved onto placing the lowers so we could install the pantry. When the pantry was installed, we realized that the pantry does NOT reach the ceiling like we previously thought.  

This was a problem because the uppers we had already installed were all the way to the ceiling.  So, down they came and we had to measure and level them all over again. 
Now the gap is even!
Once the cabinets were installed, everything seemed like it was on fast forward. I didn't take any pictures because time passed so quickly.  We primed and painted the walls, installed the appliances, and added base moldings and moldings to the top of the cabinets.  Jeff installed pendant lights over the peninsula, and the granite counter tops FINALLY arrived.


We've been able to cross off several items from our to-do list and we can see the finish line.  Hopefully within the next week I will have a finished/ decorated kitchen update!

Just for comparison's sake, here's a before and after, with a sneak peek of what we are working on this weekend:


Kitchen to-do list:
  • Demo kitchen
  • Design kitchen
  • Run electrical
  • Buy light fixtures
  • Move water
  • Add gas line
  • Build half-wall separating mudroom
  • Buy appliances
  • Install drywall
  • Prime and paint walls
  • Sand and stain floors
  • Install cabinets
  • Install new appliances
  • Trim work 
  • Buy new door to bathroom
  • Buy and install new backsplash
  • Measure and install countertops

Sunday, January 31, 2016

New house- The Little House that Could!

It's been awhile since we've posted anything, mainly because...we bought a new house!  About six months ago, we made a move from the east side of the state to the west side, and have been scrambling to find a home.  We knew we wanted a house that would let us test our DIY chops on a kitchen reno.  After many house tours, we settled on a cute 3 bedroom, 2 bath in the Fulton Heights neighborhood.  The house was previously a rental home, and it was rough!  The moldings were beat up, the floors were all scratched, and oooo-weee is the kitchen pretty.  But through all of the mess and clutter, the house had original hardwood floors, original moldings, and a lot of charm.

We decided that our first project to tackle would be the kitchen. Here is a little video of the before:

*for some reason this only plays in Internet Explorer.  

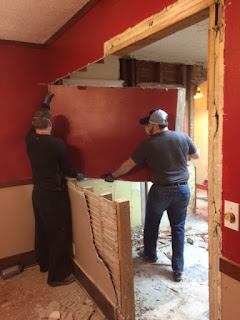
Similar to our last home, as soon as the ink dried on our mortgage papers, we headed over to the house for demo.  After an hour of intense work, here is what she looked like:

First, we had to take out each of the cabinets. Next, came the ridiculous faux brick paneling.  Behind the paneling was plaster and then a layer of lath that all had to come down.  We were ripping this kitchen down to the studs.  

We wanted to open up our kitchen, so we decided to knock down half of the wall that separates the dining room and kitchen.  This will now become a peninsula with our sink and dishwasher.  (Yes, we did have a contractor tell us if it was load-bearing or not.)
Once the walls and ceiling were demo'd, up came the floor.  I was crossing my fingers for some original hardwood- and I got it!  This is what was underneath 4 layers of linoleum:
We tried several methods of removing this glue/ paper combo, but the only thing that worked was super hot water and Murphy's Oil Soap.  

The glue became a really nasty sludge, which we had to shovel into the trash.  Here's what it looked like after three days of demo:
Already.so.much.better.


We haven't been able to make much progress since we've been waiting a lot on our electrician and drunk plumber.  Jeff was able to make a half wall to block off the former "nook" area, as well as drywall the left side wall, which doesn't have electrical. 


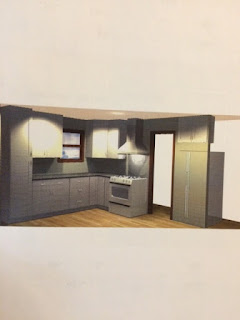
As I said before, we are doing a little rearranging of the layout with this kitchen.  The wall that used to separate the kitchen from the dining room has now become a peninsula, which will have a bar top built into it.  The water had to be moved from over by the window to our new sink area.  We also switched from an electric stove to a gas stove. We had a professional do that part for us so we don't blow up our new house.  The nook area will eventually have a door to the outside installed in it, so it will become a mudroom.  We bought our cabinets from Home Depot because they had the best deal and the style we wanted.  We decided that since we lost some of our cabinetry with removing part of the dining room wall, that we would order cabinets that go all the way to the ceiling.  Not only will our kitchen appear taller, but now we have more storage than before!  
Mock up of the kitchen from the peninsula corner. 

Mock up of the peninsula while standing at the window.  

We should have some more progress after this next week, so stay tuned.  Cabinets arrive next week! 

Kitchen to-do list:
  • Demo kitchen
  • Design kitchen
  • Run electrical
  • Buy light fixtures
  • Move water
  • Add gas line
  • Build half-wall separating mudroom
  • Buy appliances
  • Install drywall
  • Prime and paint walls
  • Sand and stain floors
  • Install cabinets
  • Install new appliances
  • Trim work 
  • Buy new door to bathroom
  • Buy and install new backsplash
  • Measure and install countertops